Breaking News

Receive all updates via Facebook. Just Click the Like Button Below...

January 4, 2015

Microcontroller - Introduction

Microcontroller

Microcontroller can be termed as a single on chip computer which includes number of peripherals like RAM, EEPROM, Timers etc., required to perform some predefined task.


There are number of popular families of microcontrollers which are used in different applications as per their capability and feasibility to perform the desired task, most common of these are 8051, AVR and PIC microcontrollers.

         
With microcontrollers in general, it is good to know that these little chips are found everywhere. You can find them in microwaves ovens, new applicances, automobiles, televisions, etc. These microcontrollers control and sense the surrounding electronics and environment. For example, microcontrollers can provide output to a display, motor, LEDS, etc., sensing the environment, such as tilt using an accellerometer, light, angular velocity using a MEMS (Microelectromechanical System) gyroscope, sound, encoders for movement, temperature, and button or keyboard input.


To give you a basic understanding of the microcontroller, the AVR Atmega32 microcontroller is considered to be a computer on a chip. The microcontroller is able to execute a set of instructions in the form of a program. The program language that I will be using for theseprojects is C++. To giv ethe usersof this website the best opportunity to learn, the C++ programs will be explained is great detail.

AVR

AVR was developed in the year 1996 by Atmel Corporation. The architecture of AVR was developed by Alf-Egil Bogen and Vegard Wollan. AVR derives its name from its developers and stands for Alf-Egil Bogen Vegard Wollan RISC microcontroller, also known as Advanced Virtual RISC. The AT90S8515 was the first microcontroller which was based on AVR architecture however the first microcontroller to hit the commercial market was AT90S1200 in the year 1997.
AVR microcontrollers are available in three categories:


1.      TinyAVR – Less memory, small size, suitable only for simpler applications


2.      MegaAVR – These are the most popular ones having good amount of memory (upto 256 KB),               higher number of inbuilt peripherals and suitable for moderate to complex applications.

3.      XmegaAVR – Used commercially for complex applications, which require large program memory         and high speed.
The following table compares the above mentioned AVR series of microcontrollers:
 
Series Name
Pins
Flash Memory
Special Feature
TinyAVR
6-32
0.5-8 KB
Small in size
MegaAVR
28-100
4-256KB
Extended peripherals
XmegaAVR
44-100
16-384KB
DMA, Event System included
What’s special about AVR?
They are fast: AVR microcontroller executes most of the instructions in single execution cycle. AVRs are about 4 times faster than PICs, they consume less power and can be operated in different power saving modes. Let’s do the comparison between the three most commonly used families of microcontrollers.
8051
PIC
AVR
SPEED
Slow
Moderate
Fast
MEMORY
Small
Large
Large
ARCHITECTURE
CISC
RISC
RISC
ADC
Not Present
Inbuilt
Inbuilt
Timers
Inbuilt
Inbuilt
Inbuilt
PWM Channels
Not Present
Inbuilt
Inbuilt
Read more ...

November 27, 2014

16x2 LCD Module

16x2 LCD

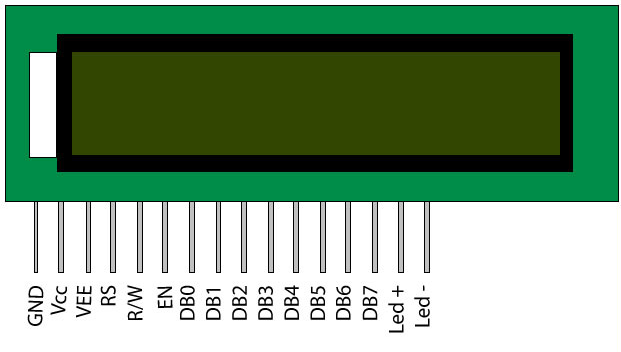
16x2 LCD means it can display 16 characters per line and there are 2 such lines. In this LCD each character is displayed in 5x7 pixel matrix. This LCD has two registers, namely, Command and Data.


LCD (Liquid Crystal Display) screen is an electronic display module and find a wide range of applications. A 16x2 LCD display is very basic module and is very commonly used in various devices and circuits. These modules are preferred over seven segments and other multi segment LEDs. The reasons being: LCDs are economical; easily programmable; have no limitation of displaying special & even custom characters (unlike in seven segments), animations and so on.

The command register stores the command instructions given to the LCD. A command is an instruction given to LCD to do a predefined task like initializing it, clearing its screen, setting the cursor position, controlling display etc. The data register stores the data to be displayed on the LCD. The data is the ASCII value of the character to be displayed on the LCD. Click to learn more about internal structure of a LCD.
 
Pin Diagram: 


 Pin No
 Function
 Name
1
Ground (0V)
Ground
2
Supply voltage; 5V (4.7V – 5.3V)
 Vcc
3
Contrast adjustment; through a variable resistor
 VEE
4
Selects command register when low; and data register when high
Register Select
5
Low to write to the register; High to read from the register
Read/write
6
Sends data to data pins when a high to low pulse is given
Enable
7
8-bit data pins
DB0
8
DB1
9
DB2
10
DB3
11
DB4
12
DB5
13
DB6
14
DB7
15
Backlight VCC (5V)
Led+
16
Backlight Ground (0V)
Led-

The LCD works with voltage pulses only and that with precise timing and voltage levels. Hence special kinds of LCD drivers are developed to drive the LCD. Two or more of this kind of driver ICs together with the LCD screen forms LCD modules which are normally found in embedded systems.The LCD module makes a system stand-alone which can take input and display the corresponding output.
Read more ...

October 22, 2014

Xiaomi Mi 3 full specification and Buy now


Xiaomi Mi 3


Accelerate your life

The fastest Mi phone ever

A dragon in your pocket


Qualcomm Snapdragon 800 8274AB 2.3GHz processor, Adreno 330 450MHz GPU, 2GB LPDDR3 RAM, and eMMC 4.5 flash memory. 


Experience your favourite games and apps at blazing speeds with the latest and most powerful processor from Qualcomm - 8274AB.

2GB LPDDR3 RAM

LPDDR3 is 50 percent faster than its predecessor
and consumes 20 percent less power.

Stunningly beautiful


5-inch IPS display. Full HD at 16:9.


See crisp details in 1080p HD video or rich textures in 3D game environments. Your photos look more vibrant in your hands now. Our full-screen, anti-glare coating gives you high screen readability wherever you go.


13MP camera with dual-LED flash


Take amazing photos in low light with a super-large Exmor sensor and an f/2.2 aperture. The built-in Phillips dual-LED flash quickly adds the perfect lighting to make your subjects beautiful. Never miss another photo opportunity again.


Power through your day

  • 500 hours of standby time
  • 50 hours of music playback
  • 25 hours of talk time
  • 21 hours of 3G Internet use

Lose the wires

Dual-band Wi-Fi (2.4Ghz/5Ghz) gives you the room to go wireless and still enjoy high speed Internet access. NFC (Near Field Communication) gives you the contactless freedom to augment your digital lifestyle.

Amazing from the inside out


Mi 3 is 8.1mm thin, 145 grams light, and houses an aluminum-magnesium alloy frame, coated with 3 layers of thermal graphite.

Make Android yours

We listen. The features in MIUI are based on the feedback we get from our 35 million users. We are constantly looking for new ways to make MIUI more useful, more secure, and more fun. We work around the clock (and drink much coffee) to fix bugs, and deliver new updates to your phone as quickly as possible.

Technical Specifications 

Weight and dimensions


Chipset
CPU            Qualcomm Snapdragon 800 8274AB
CPU XT 712
GPU Adreno 330


Camera
Camera (back) 13 Megapixels
Aperture                              f2.2
Wide-angle 28mm
Flash dual-LED
Camera (front) 2 Megapixels
Sensor type Stacked CMOS
Both cameras (front and back) support 1080p HD video recording
* Mi 3 supports Mini SIM cards.


Connectivity
Cellular and wireless

Supports 3G(WCDMA) and 2G(GSM) networks
Frequencies
  • 2G:GSM 850/900/1800/1900MHz
  • 3G:WCDMA 850/900/1900/2100MHz
Data services GPRS/EDGE/DC-HSPA+(42Mbps)

GPS
GPS + GLONASS, AGPS

Bluetooth
Bluetooth®4.0, Bluetooth HID

Wi-Fi
Wi-Fi Display,Wi-Fi Direct,5GHz Wi-Fi

OTG USB                  Yes


Battery
Capacity            3050mAh lithium-ion battery


    Multimedia
Microphone                Supported
NFC      Supported
Haptic feedback   Supported


RAM
RAM                       2GB RAM
Flash Memory 16 GB


Display
Display                                 5-inch Full HD 1080p LCD touch display
IPS IPS Retina display manufactured by Sharp or LG
PPI 441
Resolution 1920x1080 FULL HD
Touch sensor Supported


Video
Video Recording                       1080p HD video recording
Others Video stabilizer


Audio
Software Dirac         HD sound


Sensors
Gyroscope                           Supported
Light sensor Supported
Accelerometer Supported
Proximity sensor Supported
Electronic compass Supported
Barometer Supported


Operating System
Android 4.3 optimized with MIUI version 5
It is only Available on Flipkart.

Read more ...

September 17, 2014

Water Sensor Circuit

Water Sensor Circuit


This water sensor circuit is very sensitive to trigger and activate the audio visual alarm when wetness is sensed at its probes. This project is useful at homes to detect the water supply in the situations when the timing of water supply is not fixed. This circuit uses the 555 timer along with some sensor element which can detect moisture.
In this water sensor circuit based project, 555 timer works in astable mode. It is driven by the emitter current which is coming from BC548 transistor as this transistor has high gain. In astable mode IC 555 functions as an oscillator. So for 555 to work in full oscillator mode a high current is required so as to trigger it. As the probes sense the moisture on it, the transistor gets switched ON and small current starts flowing between the base and the emitter. When no moisture is detected i.e. in dry state it remains OFF.

Initially as the supply is switched ON, the voltage at output pin of 555 timer is 0V. At this stage transistor will not conduct as the emitter current is LOW. Pin8 i.e. Vcc of 555 timer is connected to the collector of the transistor. As the transistor is switched OFF there will be no supply to 555 timer. As the water is sensed at the probes, transistor gets into its saturation region and starts conducting. As a result 555 gets supply for its operation. Its operation starts very soon as it is in astable mode. Sound is produced because of output pulses at pin3 which drives the loud speaker.


An ON/OFF state switch is used to control the conduction. The probes should be made up of non reactive metal so that there will be no inductance or capacitance present. An alternative can also be there i.e. use of alternate copper wires. No base resistor is required in this circuit because the transistor is in switch mode. The impedance at the emitter or the oscillator circuit acts as current limit. 


Read more ...

September 16, 2014

Vehicle Indicator circuit

Vehicle Indicator circuit


The project illustrated below helps to find out nearby person or vehicle and make them visible to one another. It can be used in various applications for pedestrians, runners, bicyclists, motorcyclists, vehicles etc.
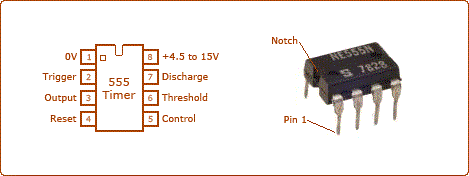
Most of the time during the night when the roads are badly lit the risk of accidents increases. Sometimes it happens that our vehicle breaks down and we need help. In such conditions this reflector can be used which automatically gets turned ON when it receives light from another vehicle passing nearby.  The circuit is based on 555 timer IC and uses a NE555 version of it. The pin diagram of the IC is shown in the image


 The reflector circuit consists of Light dependent resistor (LDR), timer IC (NE555), some bright LED’s and Transistor (BC549) which is used as buffer. In this project 555 timer is configured in oscillatory mode.
When ambient light is dim a potential drop occurs across the light dependent resistor (LDR) below the level set by VR1. Due to this the reset terminal (PIN4) of NE555 goes high to enable the oscillator.
In other words we can say that in the presence of light, the resistance at PIN4 of IC1 is very low. Hence no signal is passed to PIN4 of IC1 so the voltage at pin 4 becomes equal to zero. As a result of this low voltage the circuit remains OFF and in the darkness vice versa occurs so PIN4 of IC1 becomes high and we get the output. 


this circuit can also be used as emergency night light, which puts on automatically.
Read more ...
Designed By Published.. Blogger Templates